
Until this past summer, I was on somewhat of a bread hiatus. I’d gone from years of frenzied gluten-free bread-baking to practically forgetting its existence. I was done with dense bricks of off-tasting sponges, especially after one of my “small” loaves clocked in at (over) five pounds. There is nothing light and airy about a five pound loaf of bread. Nothing.
Everything changed when a reader, Laurel, made some very lofty praises about a vegan, gluten-free bread recipe she’d been using. I was hesitant, but moved forward, wanting to provide her feedback, and secretly hoping for some kind of success.

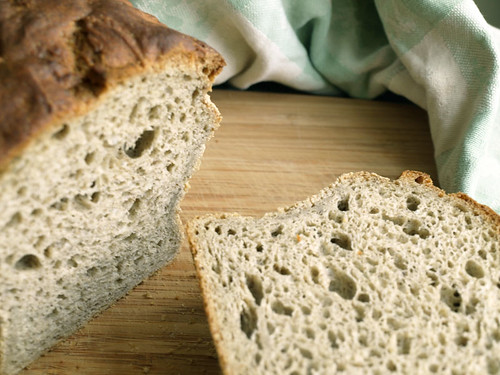
And now, I believe in bread, once again. Is it perfect? No(t quite). In my world, it’s very close. Crusty outside, soft inside (with a bit of spring), totally slice-able, edible for three days on the counter (without crumbling into oblivion), whole-grain, VEGAN, and, well, good.

I’d serve this to guests without thinking twice, apologizing, or offering up lengthy explanations.
Sandwiches are a real entity again. It’s a work in progress, for sure, but I’m finally enjoying the work again.
I’d never thought of an item’s vegan status as an inherent strength, but in this case, it is key. This bread is light, without burden, thanks to the simplicity of ingredients; eggs, butter, and milk can really weigh a loaf down. So I’ve learned.
The ten loaves I’ve made thus far have all turned out reasonably well, though always slightly nuanced depending on the weather and my demeanor (impatience is not a virtue in bread making).

Gluten-Free, Vegan, Buckwheat Bread
Adapted by: CinnamonQuill
Supplied by: Laurel
Originally sourced by: Gluten Free, Soy Free, Vegan
Yield: One 8×4 inch loaf (If doubled: two 8×4 inch loaves, or one 9×5 inch loaf)
*Recipe may be doubled; if doubling, do not double yeast! Use only 1 Tablespoon.
1 Tablespoon yeast (EDIT: I strongly recommend using active dry, because of mixed results with rapid rise.)
1/4 cup sugar (may use less/may instead use honey/brown sugar/agave)
1 1/2 cups + 2 Tablespoons warm water
3/4 cup millet flour
1/4 cup buckwheat flour
1/2 cup sorghum flour
1/2 cup arrowroot flour
1/2 cup potato starch (not potato flour)
1/2 cup tapioca flour
2 teaspoons xanthan gum
1/2-1 teaspoon salt
2 Tablespoons olive oil
Extra oil for pan(s)Preheat oven to lowest setting, or prepare alternate warm area for bread rising. Generously oil an 8×4 bread pan. Or, for a double recipe: two 8×4 bread pans or one 9×5 inch bread pan.
I don’t follow much of a procedure here, so feel free to deviate from my method. In large mixing bowl, combine yeast, water, and sugar; let proof for ten minutes, or until foamy. Add remaining ingredients. Mix with paddle attachment for 2-3 minutes on medium speed. Scrape sides; mix for a minute more, until well combined and elastic-y. It will be like really sticky cake batter.
Spoon into chosen pan(s). Smooth top with fingers or spatula. Cover lightly with damp bread cloth or oiled plastic wrap. Let rise in a warm place for 35ish minutes, until bread has reached an inch above the bread pan edge, or a little more (should increase in size by at least a third, of course, this is a bit relative).
For crispy, brown crust: preheat oven to 450F, bake bread for 10-15 minutes, then lower heat to 375F. If you like a less crusty outside, initially preheat oven to 400F, bake bread for 10-15 minutes, then lower to 375F for the remainder of the baking time. If you feel that the bread is getting too brown, cover with aluminum foil. I don’t do this, but I am enthralled by crust.
Bake for 45-55 minutes total (This will vary, depending on your oven!). Bread should sound hollow, pull slightly away from edges, and a knife inserted into middle should be nearly clean.
Cool in pan for ten minutes, then remove, using a knife to cut around edge of pan before un-molding. If bread seems soft, set it back into the loaf pan to finish cooling. If it seems surprisingly undercooked, place it back in the pan, and let it cool in the warm oven (turned off).
It really is worth waiting (though almost impossible) for the bread to cool before hacking into it. If you must, at least oil a bread knife before trying to serrate your way through the steaming mass; it will lessen the damage.
Bread keeps 2-3 days on counter; after that, slice and freeze. Reheating in oven, microwave, or toaster will do wonders for dry or frozen bread. Trust, and believe.
-As stated above, this bread is a glorious work in progress. It is a bit too soft to bake free-form, but I think it would work well in a small casserole or large ramekin/souffle dish.
-The original recipe called for teff flour, but I was out at the time, so I used buckwheat. I would think this amount could easily be swapped with amaranth, oat, almond, rice, or other heavy gluten-free flours.
-In this recipe, I’ve found that active dry yeast works slightly better than rapid rise yeast. Either will deliver decent results, but the texture seems slightly better with active dry. The rise time seems to be the same.
-As seen from these photos, my bread probably over-rose a bit, so the air bubbles were slightly out of control. Nothing major, obviously, and the texture was not displeasing in the least; working with yeast always seems a little unpredictable (or is it just me…), but with this recipe, it’s safe to embrace the uncertainty.


